Wednesday, February 4, 2009

A Slice of Summer

You know, when I think of winter foods, the first thing that comes to mind is the flavors of spices, like cinnamon, nutmeg, and ginger. The next thing that I think of is probably food that is relatively heavy and filling--comfort food. Well, this recipe for Orange Cranberry Bread is neither. Its bright citrus flavor and slightly tart (okay, maybe more than slightly tart) cranberry component make it a light-tasting, summery quick bread.

Now, I don't really have an interesting story as to where I got this recipe, but you will be glad to know that it is not from any sources at America's Test Kitchen! In fact, it's from Baking Bites, one of my favorite blogs. I had been meaning to make the recipe for a while, and I'm glad that I finally got around to baking this loaf.

The quick bread is very low in fat, with only two tablespoons of canola oil and one egg. I halved the recipe and made it in an 8x4 loaf pan, and it came out great. Not dry at all, but not too dense or heavy, and it comes together in just minutes. I definitely recommend trying this Orange Cranberry Bread the next time you make a cup of tea or want something special for breakfast, dessert, or a snack.

Orange Cranberry Bread
Adapted from Baking Bites.
Serves 12.

2 cups all-purpose flour
1 cup sugar
3/4 teaspoon baking soda
3/4 teaspoon baking powder
1/2 teaspoon salt
1 tablespoon orange zest
3/4 cup orange juice, preferably freshly squeezed
2 tablespoons canola oil
1 large egg
1 1/4 cups fresh or frozen (unthawed) cranberries
1/4 cup dried cranberries

**Preheat oven to 375 degrees F.**

1. Grease a 9x5-inch loaf pan.
2. In large bowl, whisk flour, sugar, baking soda, baking powder, and salt.
3. Add zest, juice, oil, and egg. Mix just until incorporated.
4. Gently stir in cranberries.
5. Pour into prepared pan and bake for 45 to 55 minutes, or until a toothpick inserted in center comes out with moist crumbs. Let cool completely before serving.

Monday, January 19, 2009

I Must Put Down the Cinnamon.

I know, I know, there are desserts that do not have cinnamon, but where would we be without the possibility of a delicious, irresistibly spicy, deep-flavored treat? Nowhere, that's where. So I present to you another cinnamon-influenced dessert that is sure to please young and old alike: snickerdoodles.

Now, snickerdoodles are a New England tradition. I remember always getting them from a local bakery and savoring the interesting flavor combination--on the one hand, the sweetness and warmth of cinnamon sugar, and on the other hand, the tanginess and distinctive flavor of the cookie itself. If you think that snickerdoodles are simply sugar cookies rolled in cinnamon sugar, you are wrong. I used to hold that misconception, but I have since seen the light and discovered that, despite my best efforts to simplify my baking recipes, snickerdoodles are different. They cannot be faked; they cannot be dumbed down.

The unique flavor and appearance of these cookies come in part from the inclusion of cream of tartar in addition to baking soda. The cream of tartar gives the cookies a good tang and facilitates their crackly, fallen tops. So don't worry if the cookies fall; they're supposed to. Isn't that a load off your mind?

The recipe itself is from Baking Illustrated, from which I've already made more recipes than I can count (none of them got on this blog, though) and which I really must put down. Right next to the cinnamon. As always, the good folks at America's Test Kitchen are spot on with the recipe, and the cookies taste exactly I remember them. But better. :-)

Snickerdoodles
Adapted from Baking Illustrated.
Makes about 30 cookies.

3 tablespoons granulated sugar
1 tablespoon cinnamon
2 1/4 cups (11.25 ounces) all-purpose flour
2 teaspoons cream of tartar (do not substitute)
1 teaspoon baking soda
1/2 teaspoon salt
12 tablespoons unsalted butter, room temperature
1/4 cup vegetable shortening (do not substitute)
1 1/2 cups granulated sugar
2 eggs

**Preheat oven to 400 degrees F.**

1. Adjust oven racks to upper-middle and lower-middle positions. Grease two medium or large baking sheets.
2. In small bowl, mix cinnamon and 3 tablespoons sugar. Set aside.
3. In medium bowl, whisk flour, cream of tartar, baking soda, and salt until well combined. Set aside.
4. In large bowl, cream butter, shortening, and 1 1/2 cups sugar on medium-high speed until blended thoroughly, 1 to 2 minutes.
5. Add eggs and beat for about 30 seconds.
6. Stir in dry ingredients just until incorporated.
7. Using your hands, roll dough into one-and-a-half-inch balls and coat with cinnamon/sugar mixture. Place two inches apart on baking sheets.
8. Bake for 9 to 11 minutes, until centers are soft and puffy and edges are set.
9. Let cool 2 minutes on baking sheets, then transfer to wire rack to cool completely.

Friday, January 9, 2009

You'll Want To Eat ALL the Crumbs...

(Oh my, it has been a long time since I've posted. My sincerest apologies; I fully intended to keep updating, but my busy schedule got in the way. An excellent recipe, however, has roused this blog from its hibernation...)

There's coffee cake, and then there's coffee cake. I'm not talking about the ordinary, ho-hum, run-of-the-mill yellow cakes with a smattering of thin cinnamon streusel. The real deal is crumb cake as it's done in New York: tender cake absolutely loaded with buttery, crunchy crumbs that fall all over the place and positively burst with flavor.

Hungry yet? I bet you're wondering how to make such a wickedly good concoction. Well, this delightful treat is from the folks at America's Test Kitchen, whose recipes have never failed me. The cake itself is extremely easy to make and comes together quickly--less than 5 minutes. The crumbs, on the other hand, are another story. Each crumb is formed individually by hand from a soft dough, and there are literally hundreds of crumbs. This process took me a good 45 minutes to an hour; it definitely fell into the "labor of love" category.

The successful cake you see here is, in fact, my second attempt. You see, at first, I thought that the recipe was a dud, or at least not the best crumb cake recipe out there. I later figured out that I had made two mistakes: for one, I tried to substitute my usual milk and vinegar mixture for buttermilk; secondly, I made the crumbs pretty big. This was unfortunately a bad combination: the buttermilk substitute made the batter too thin, and the heavy crumbs sank, giving the finished cake an appearance (but not texture) somewhere between sausage cornbread and fruit suspended in Jell-O. The second time, I used real buttermilk and made smaller crumbs, and I was much more successful.

The cake was absolutely delicious and definitely worth the effort! You may even need to brew some coffee to give yourself an excuse to indulge. :-)

New York-Style Crumb Cake
Adapted from The Best of America's Test Kitchen 2008.
Makes one 8-inch square cake.

Crumb Topping:
8 tablespoons (1 stick) unsalted butter, melted and still warm
1/3 cup granulated sugar
1/3 cup packed light or dark brown sugar
3/4 teaspoon ground cinnamon
1/8 teaspoon salt
1 3/4 cups (7 ounces) cake flour

** Preheat oven to 325 degrees F and set oven rack to upper or upper-middle position. **

1. Whisk the warm melted butter, sugars, cinnamon, and salt together in a medium bowl.
2. Stir in flour until mixture becomes a thick dough and no streaks of flour remain.
3. Let cool 10 minutes.
4. Lay sheet of wax paper on workspace.
5. Break off pieces of dough and roll them between your fingers to the size of peas. The crumbs must be relatively small. Set each crumb on wax paper so that all the crumbs are in a single layer or are slightly overlapping.

Cake:
1 1/4 cups (5 ounces) cake flour
1/2 cup granulated sugar
1/4 teaspoon baking soda
1/4 teaspoon salt
6 tablespoons unsalted butter, cut into 6 pieces, softened
1/3 cup buttermilk
1 egg
1 egg yolk
1 teaspoon vanilla extract
Crumb topping

1. In large bowl, whisk together cake flour, sugar, baking soda, and salt.
2. With electric mixer on low speed, add butter pieces one at a time. Mix until no large chunks of butter remain, 1 to 2 minutes.
3. Add buttermilk, egg, egg yolk, and vanilla. Beat on medium-high speed until batter is light and fluffy, about 1 minute, scraping sides of bowl if necessary.
4. Scrape the batter into a greased 8 x 8-inch pan and smooth the top with a knife or rubber spatula.
5. Sprinkle crumbs evenly over cake, working from the edges toward the center so as not to make the center too heavy.
6. Bake in preheated oven until crumbs are golden and a toothpick inserted near center comes out with moist crumbs, 35 to 40 minutes.
7. Cool on a wire rack and enjoy warm or at room temperature. If desired, dust with powdered sugar just before serving.

Wednesday, July 23, 2008

"Splendid" Muffins


I love a good muffin--a fluffy, vanilla-flavored concoction just filled to the brim with blueberries, strawberries, chocolate chips, whatever strikes your fancy. Sometimes, though, in the name of healthy living, we must cut back on the sugar. I know, I know, I'm a baker, I'm not supposed to be anti-calories, and I'm not... but an effort to reduce the calories in an old favorite can never hurt.

Enter Splenda. I've always been a fan of Splenda because it's nice and sweet and because it doesn't have an unpleasant aftertaste. When I was in the store a couple of days ago, I noticed a bag of Splenda "Granular" on the shelf and decided to buy a small bag and give it a try. Although it is very, very different in texture and density to sugar (it looks a bit like snow), it measures cup for cup in recipes. Muffins and quick breads are especially noted on the bag, so I figured that there would be no better way to test Splenda Granular than with a nice blueberry muffin.

I used my regular muffin recipe--after I put the muffins the oven, I noticed a blueberry muffin recipe on the back of the bag, haha!--adding a bit of baking soda (probably unnecessary) and a touch of honey (to help browning). When the muffins came out of the oven, their tops were craggy, almost sconelike, but the interior was very, very nice. Given a sugar-laden muffin, I would not have been able to tell the difference, and I could pronounce my Splenda experiment a success.

Even if you don't have Splenda on hand, this recipe is a great basic muffin, but I would especially recommend it to be made with Splenda if you're watching calories. One muffin here has at most 175 calories, according to my calculations. I'm not one for healthy baking, but this was a nice change of pace!

Splendid Blueberry Muffins
Makes 12.

280 grams (2 cups) all-purpose flour
2 teaspoons baking powder
1/2 teaspoon salt
3/4 cup Splenda Granular sugar substitute (or granulated white sugar)
1/3 cup butter, melted
2 eggs
1/4 cup honey (omit if using sugar)
1/2 cup milk (I used skim)
1 cup blueberries

** Preheat oven to 350 degrees F. **

1. In medium bowl, combine flour, baking powder, and salt. Stir in blueberries, and set aside.
2. In large bowl, whisk together Splenda (or sugar), butter, eggs, and honey.
3. Whisk in milk until smooth.
4. Gently add dry ingredients to wet ingredients, and mix until just combined.
5. Divide batter among muffin cups and bake for 15 to 25 minutes, or until a toothpick inserted in center comes out with moist crumbs attached.
6. Let cool completely on wire rack before serving.

Sniffing Around

Peabody, of Culinary Concoctions by Peabody, recently posted a delicious-looking recipe for Brown Sugar Pound Cake. The mouth-watering pictures are enough to make me try a Martha Stewart recipe for the first time. And that's an accomplishment, for sure.

One of my very favorite foods is peanut butter--not any of that natural stuff, either, but good ol' creamy Jif. You know, the processed stuff. But I think I would enjoy Peanut Butter Crumble Cake (courtesy of Baking Bites with any brand of peanut butter, and cheers to Nicole for introducing yet another recipe to my test file!

I think oatmeal is the forgotten flavor of cookie, yet a nice, soft, spicy oatmeal cookie is one of the most satisfying experiences. Marilyn of Simmer Till Done has thought of 25 Ways to Make Oatmeal Cookies Even Better, and, although not all twenty-five are to my taste, that post has certainly whetted my appetite for an old-fashioned oatmeal cookie, maybe with a twist or two.

Looking for something a little richer and fancier than cookies? Try the Sour Cream Scones, as featured on Joy the Baker's blog. They look so fluffy and delicious--and after you're done drooling over those photos, scroll down for a fun list of Joy's other loves.

I've done a whole lot of baking, but I've never made a jelly roll. Well, the Lemon Berry Roulade at Pastry Studio has inspired me to try something new. It just looks so refreshing and delicious!

And finally, the savory... I think that everyone should know How to Boil an Egg, and Sydney of The Crepes of Wrath shows us this important skill. So if you're in need of a delicious, nutritious snack, take a break from baking and try some hard-boiled eggs--you won't regret it.

That's all for my sniffing around this time. Stay tuned to "Smells Like Dessert" for recipes, tips, tricks, amusements, and general oddities!

Monday, July 21, 2008

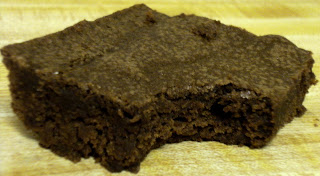
The Perfect Brownie. There, I Said It.


I apologize if the post title shocked or scandalized you, but I had to be bold, to make a statement: I have, in fact, found my perfect brownie. Now, I understand that people's ideas of the "perfect" anything, especially brownie, are different, so fear not... I will not try to impose my own personal brownie beliefs on you. But you might as well know where I stand. Most importantly, in the fudgy vs. cakey battle, I fight for the fudgy side, with the caveat that I do like my brownies to have a little structure. I see these ridiculously low amounts of flour--like 1/4 cup--in recipes, and I find myself wanting more than just a big pan of chocolate, butter, sugar, and eggs.

I have fond memories of childhood baking. One of the most fun moments in the kitchen was with my sister, making brownies from a cookbook we had just gotten called Kids Cooking: A Slightly Messy Manual by Klutz (as a side note, one of my friends swears by the chocolate chip cookie recipe in there, but we all know I have my favorite). She and I worked together, cooking up a storm, to make a pan of these brownies, and they were absolutely wonderful, garnering rave reviews from all who partook. And we never made them again because we lost the book.

For the next several years, I would make brownies and think of how they paled in comparison to the joyous chocolatey morsels that emerged from the oven that one evening many years ago. It was not until college that I decided to search on Google for two words, "brownies+Klutz," and, miraculously, I found the recipe and immediately (not kidding!) made brownies for my friends, who declared them the best brownies they had ever had. This is good stuff, people. And then, I went home and, equally miraculously, found the cookbook hiding behind other volumes! What joy, what rapture!

And so, readers, now that I have regaled you with a heartfelt childhood story, I urge you to try this brownie recipe (and it's one bowl, too!). If you wish, you may substitute 3 ounces unsweetened chocolate for the cocoa powder, but I'd try the original recipe first just to experience for yourself the enchanting brownies that have lived in my memories for years. Be sure to measure the flour lightly. This is different from the other recipes on this blog because, for this particular recipe, measure flour as follows: first, place the measuring cup on the counter and fluff up the flour with a regular spoon. Then, take a spoonful of flour and plop it into your measuring cup. Do not shake, tap, or otherwise disturb the measuring cup. Just keep going by taking another spoonful of flour and plopping it into the cup. Repeat until flour mounds over top of cup, and level off with knife. Trust me, if you just irreverently dip the measuring cup into the flour, take a big ol' scoop, and level, you'll have too much flour in the recipe, so please, for this recipe, follow the method. Do it for me. And for brownies, of course.

Okay, enough of this technical talk. Make these brownies and brace yourself because they are out of this world!

The Brownies Dreams Are Made Of
Makes 12 to 16 brownies.
Adapted from Kids Cooking.
2 cups granulated white sugar
3/4 cup cocoa powder
1 cup (2 sticks) butter, melted
4 eggs
1 teaspoon vanilla extract
150 grams (1 1/4 cups sifted) all-purpose flour
1/4 teaspoon salt

** Preheat oven to 350 degrees F. **

1. Grease an 8-inch (9-inch) square or 13- by 9-inch rectangular pan for thick or thin brownies, respectively.
2. In large mixing bowl, combine sugar and cocoa powder with whisk until homogeneous.
3. Add melted butter and whisk to combine.
4. Add eggs, all at once, and vanilla, and whisk vigorously until well incorporated.
5. Sprinkle flour and salt over wet ingredients and whisk. Finished batter should be smooth and satiny.
6. Pour into prepared pan and bake for 50 to 60 minutes (8x8 in.) or 20 to 25 minutes (13x9 in.), or until toothpick inserted in center comes out with moist crumbs.
7. Cool completely on wire rack before serving, if you can wait that long.

Saturday, July 19, 2008

Coffee? I'd Rather Have Cake!


I love baking cake; in fact, it might be one of my favorite treats to make. I was looking through my "Recipes to Test" file and saw that nearly all of them were cake recipes. That just goes to show where my tastes lie! But really, cake is very difficult to hate--there are so many flavors to choose from, and the (ideal) texture is just so lovely.

Enter the Sour Cream Coffee Cake from The Best of America's Test Kitchen 2008, of which I have posted a review. Would you believe that, before this experience, I had never used sour cream in baking? Ever? I know, it's shameful but true; I just never had occasion to. Well, this was as good a time as any to try my hand at baking with sour cream, and it really does add a lot to the texture of a cake, although I must say that non-sour-cream cakes can be just as nice.

So I have good news and bad news about this recipe. The good news is that the cake tastes delicious, and it is so light and fluffy. I cut the cake recipe in half and baked it in an 8x8-inch pan; the streusel topping I reduced to a quarter of the original recipe, and it was enough. Believe it or not, I do care just a bit about calories, and I thought it wise to reduce the streusel topping a little. Oh, and the finished topping? It was wonderful, with an excellent cinnamon flavor and a good crunch from the almonds I used.

Now the bad news. My "oh damn" moment... Due to the different pan size, I was unsure of baking time (I usually estimate correctly but was a bit off this time), and I tested the cake too early. Thus, I had the pleasure of watching the middle of the cake sink right before my eyes, as if I were deflating a balloon. Whoops. I'm going to blame that little blunder on the oven's less-than-well-behaved antics as of late. But the texture in the middle did not suffer terribly, so the consequences were mostly aesthetic. Even then, no one really noticed, so I didn't worry about it too much, and neither should you (if that happens)! Coffee cake, I have found, is quite a bit sturdier and therefore more forgiving than your standard, delicate, birthday-cake creation.

You may have noticed that, throughout this post, I have refrained from using the word... moist. I really hate it when people use that word because, in my opinion, that's what a cake should be. It is the normative, so to speak, and I think that saying a cake is moist or should be moist is a bit redundant. Besides, the term is overused. I prefer less tired words like velvety, silky, soft, and fluffy. And they all describe this cake, so make it! Right now! Here's the recipe!

Sour Cream Coffee Cake
Adapted from The Best of America's Test Kitchen 2008.
Makes two 8-inch square or 9-inch round cakes.

Streusel Topping:
1/3 cup packed light brown sugar
1/3 cup granulated white sugar
45 grams (1/3 cup) all-purpose flour
4 tablespoons butter, chilled and cut into 1/2-inch pieces
1 tablespoon ground cinnamon
1 cup pecans, almonds, or walnuts, chopped

Cake:
420 grams (3 cups) all-purpose flour
1 tablespoon baking powder
1 teaspoon baking soda
1 teaspoon ground cinnamon
1/2 teaspoon salt
1 3/4 cups sour cream [a 16-ounce tub should be just enough]
1 cup packed light brown sugar
1 cup granulated white sugar
3 eggs
7 tablespoons butter, melted and cooled slightly

** Preheat oven to 350 degrees F. **

1. Make Streusel: Combine sugars, flour, butter, and cinnamon in medium bowl, and rub with fingers until mixture is no longer powdery. Stir in nuts and set aside.
2. In large bowl, combine flour, baking powder, baking soda, cinnamon, and salt.
3. In medium bowl, whisk sour cream, sugars, eggs, and butter until thoroughly combine.
4. Gradually whisk sour cream mixture into dry ingredients until just blended.
5. Pour into greased pans and sprinkle topping evenly over batter.
6. Bake for 25 to 35 minutes, or until toothpick inserted in center comes out with moist crumbs attached.
7. Let cool in pan on wire rack at least 15 minutes before serving.